This is a quick setup guide for Semaphore. Semaphore is a Graphical interface for running ansible playbooks. This guide is meant to run right after the ansible setup guide and the assumption is that ansible is set up similar to that guide. If there are any differences there may need to be some adjustments.
This was installed with Ubuntu 23.10 fully updated as of the writing of this guide.
We will be manually installing a mySQL database and manually installing semaphore. You can also install it as a Docker container however that setup does require a Git repository to pull the playbooks. You can also run Semaphore as a service by setting it up in systemd. To see more about the configuration you can see the official documentation at docs.semui.co.
Setting up the Database
Install MySQL
sudo apt install mysql-server -y
sudo apt install mysql-client -y
Start the database install process.
sudo mysql_secure_installationConfigure MySQL
There will be a series of questions. Answer the questions however makes since for your deployment.
Securing the MySQL server deployment.

Connecting to MySQL using a blank password.

VALIDATE PASSWORD COMPONENT can be used to test passwords
and improve security. It checks the strength of password
and allows the users to set only those passwords which are
secure enough. Would you like to setup VALIDATE PASSWORD component?

Press y|Y for Yes, any other key for No: no

Skipping password set for root as authentication with auth_socket is used by default.
If you would like to use password authentication instead, this can be done with the "ALTER_USER" command.
See https://dev.mysql.com/doc/refman/8.0/en/alter-user.html#alter-user-password-management for more information.

By default, a MySQL installation has an anonymous user,
allowing anyone to log into MySQL without having to have
a user account created for them. This is intended only for
testing, and to make the installation go a bit smoother.
You should remove them before moving into a production
environment.

Remove anonymous users? (Press y|Y for Yes, any other key for No) : y
Success.

Normally, root should only be allowed to connect from
'localhost'. This ensures that someone cannot guess at
the root password from the network.
Disallow root login remotely? (Press y|Y for Yes, any other key for No) : n
... skipping.
By default, MySQL comes with a database named 'test' that
anyone can access. This is also intended only for testing,
and should be removed before moving into a production
environment.

Remove test database and access to it? (Press y|Y for Yes, any other key for No) : y
- Dropping test database...
Success.
- Removing privileges on test database...
Success.
Reloading the privilege tables will ensure that all changes
made so far will take effect immediately.

Reload privilege tables now? (Press y|Y for Yes, any other key for No) : y

Success.
All done!
Make sure the database is running.
sudo systemctl status mysqlEnter the MySQL terminal with sudo.
sudo mysqlCreate a MySQL user and give it permissions.
I’m using a generic password here, “Password123!” you will need a more secure password as that may not be accepted by SQL
mysql> CREATE USER 'semaphore'@'localhost' IDENTIFIED BY 'Password123!';
Query OK, 0 rows affected (0.04 sec)

mysql> GRANT ALL PRIVILEGES ON semaphore.* TO 'semaphore'@'localhost';
Query OK, 0 rows affected (0.04 sec)

mysql> EXIT;
Log into the MySQL with the semaphore user.
mysql -u semaphore -p
Enter password: Password123!
Create a database called semaphore, and make sure it was created.
mysql> CREATE DATABASE semaphore;

mysql> SHOW DATABASES;
+--------------------+
| Database           |
+--------------------+
| information_schema |
| performance_schema |
| semaphore          |
+--------------------+
3 rows in set (0.00 sec)

mysql> EXIT;
Download and install Semaphore
You can download the latest version directly from the website. There is usually a link to the most recent version in the official Install Documentation at https://docs.semui.co/administration-guide/installation . There are times when the version on the docs page does not work. In that case you can get the latest version from the official git repository https://github.com/ansible-semaphore/semaphore/releases .
Download with wget
wget https://github.com/ansible-semaphore/semaphore/releases/download/v2.9.45/semaphore_2.9.45_linux_amd64.deb
Install with dpkg
sudo dpkg -i semaphore_2.9.45_linux_amd64.debSet up Semaphore
You can set up semaphore with the “semaphore setup” command. It will ask you a series of questions. I answered this with the information from the ansible setup guide. If you have your playbooks in a specific location you will have to adjust your answers. You will also need to enter the database information from the database setup above. You can answer all of the other questions and refer to the Official documentation for setup if you are going to use any of those services (email, telegram, slack, ldap, etc.).
semaphore setup
Hello! You will now be guided through a setup to:
1. Set up configuration for a MySQL/MariaDB database
2. Set up a path for your playbooks (auto-created)
3. Run database Migrations
4. Set up initial semaphore user & password

What database to use:
  1 - MySQL
  2 - BoltDB
  3 - PostgreSQL
(default 1): 1

db Hostname (default 127.0.0.1:3306):

db User (default root): semaphore

db Password: Password123!

db Name (default semaphore): semaphore

Playbook path (default /tmp/semaphore): /home/chris/ansible

Public URL (optional, example: https://example.com/semaphore):

Enable email alerts? (yes/no) (default no):

Enable telegram alerts? (yes/no) (default no):

Enable slack alerts? (yes/no) (default no):

Enable LDAP authentication? (yes/no) (default no):

Config output directory (default /home/chris/ansible):

Running: mkdir -p /home/chris/ansible..
It will run a few tasks and then ask you for a username, email, and password. The password information needs to be filled out even if you use a fake email address. This will be the username that you use to log into the Semaphore web UI. There may be a warning when you enter the email address. Dont worry about that.
> Username: chris
> Email: [email protected]
WARN[0237] no rows in result set                         level=Warn
> Your name: chris
> Password: password123!

 You are all setup chris!
 Re-launch this program pointing to the configuration file

./semaphore server --config /home/chris/ansible/config.json

 To run as daemon:

nohup ./semaphore server --config /home/chris/ansible/config.json &

 You can login with [email protected] or chris.
You can launch the server with the commands given in teh output.
You will have to remove ./ from the beginning of the command.
Run the server and have it occupy the current terminal – Ctrl C will close the application.
semaphore server --config /home/chris/ansible/config.jsonRun the server in the background.
nohup semaphore server --config /home/chris/ansible/config.json &WebUI Configuration
The WebUI will be available at the IP address and port 3000.
Browse to the web address <ip address>:3000
Log in with the username and password you entered in the “semaphore setup”.
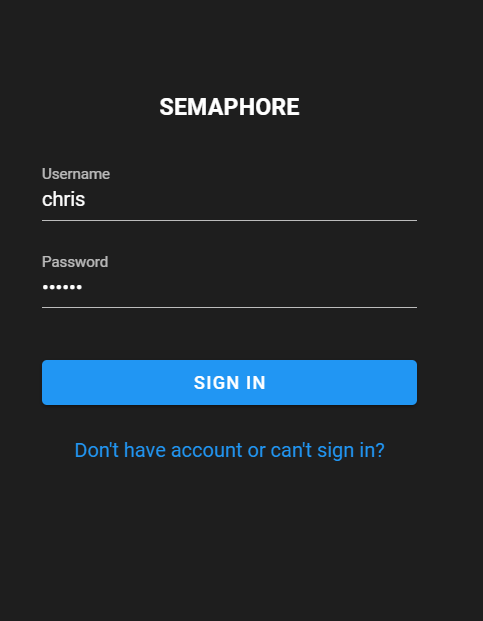
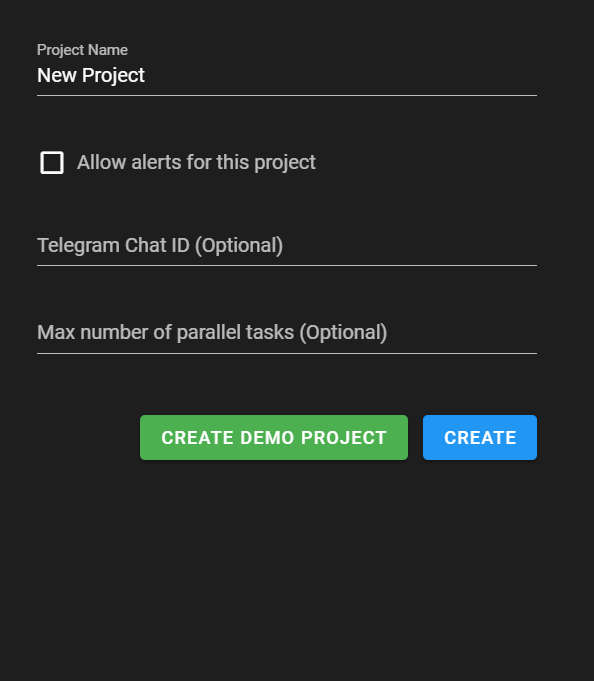
You will be presented with the option to create a new project.
There can be multiple projects in the configuration.
Give the project a name and hit “CREATE”
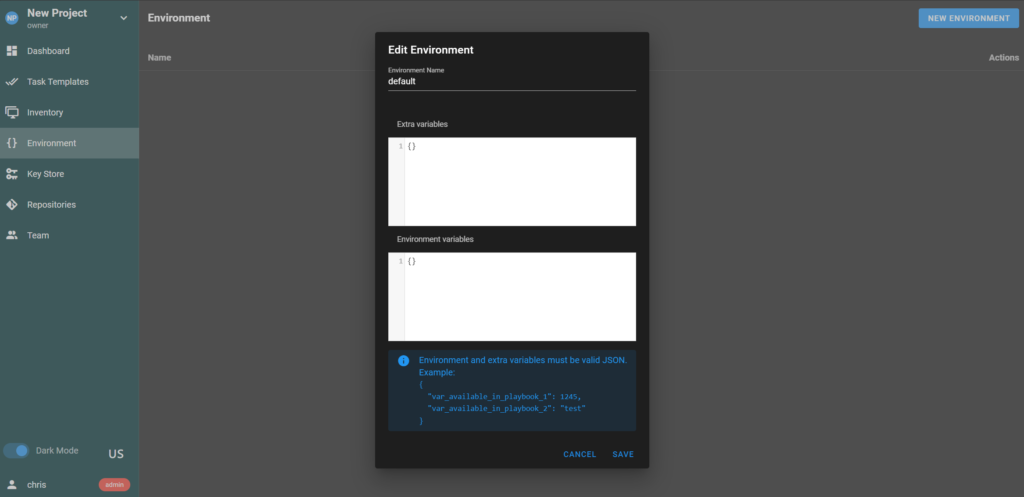
Click on “Environment” at the center left of the page.
Click on “NEW ENVIRONMENT” at the top right.
We are not going to be adding anything here yet, but there has to be an environment set up.
Give it a name, I used “default” in this example.
Enter a set of curly brackets { } in each box.
Click “SAVE”
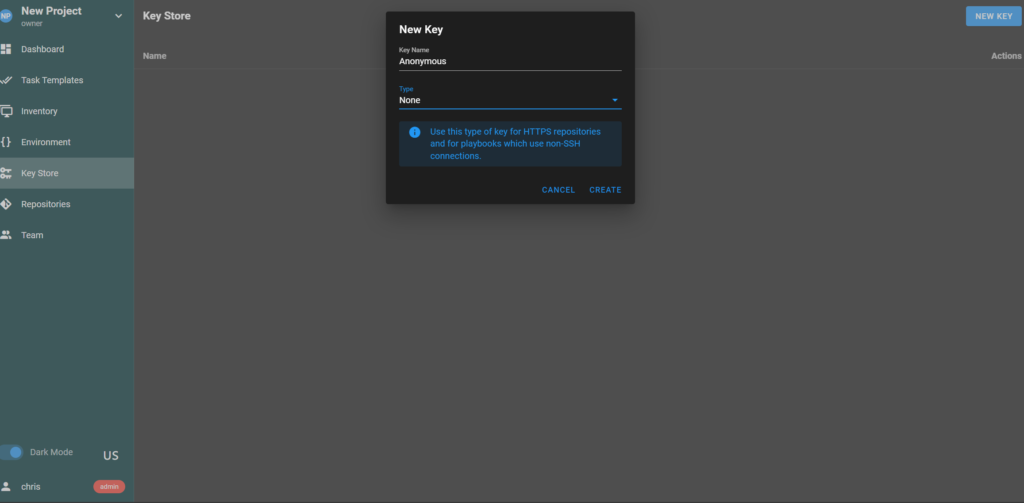
We will need to add two entries into they Key Store. One for anonymous login and one for SSH.
Click on “Key Store”.
Click “New Key” at the top right.
The Key name does not really matter for this one.
I use Anonymous for anything that Semaphore should already have access to.
In the drop down select “None”
Select “CREATE”
Click “NEW KEY” in Key Store again, and create one for the ansible login that was created in the Ansible Quick Install guide. If you did not follow the guide you will be entering whatever is appropriate for your key.
Select Type drop down and select SSH key.
Enter the Username – ansible in this case.
If a passphrase is associated with this key enter it here.
Enter the private key text. You will need to use cat in the Linux terminal to get the private key text.
Don’t share your private key – Especially not on the internet 🙂 . This key is not real and this VM no longer exists.
cat /home/chris/.ssh/ansible
-----BEGIN OPENSSH PRIVATE KEY-----
b3BlbnNzaC1rZXktdxOQAAACB2ZaXasdfAAAAAAAZQAAAAAAAAABAAAAMwAAAAtzc2gtZW
QyNTUxOQAAACB2ZaXPNVDcHschY4traZ8kfWTIOTTtVjJxX3uIOpHAcgAAAJgXE/uLFxP7
iwAAAAtzc2gtZWQyNTUxOQAAACB2ZaXPNVDcHschY4traZ8kfWTIOTTtVjJxX3uIOpHAcg
AAAEDCyP2d4vjV5t6+gQ51K71hZ3FRZZ1WB1nTLFkAdPIrtXZlpc81UNwe+gQ51K71hZ3F
RZZ1WxyFji2tpnyR9ZMg5NO1WMnFfe4g6kcByAAAAFGNocmlzQGFuc2libGVtYW5AAAtzc
2gtZWQyNTUxOhZ2VyAQ==
-----END OPENSSH PRIVATE KEY-----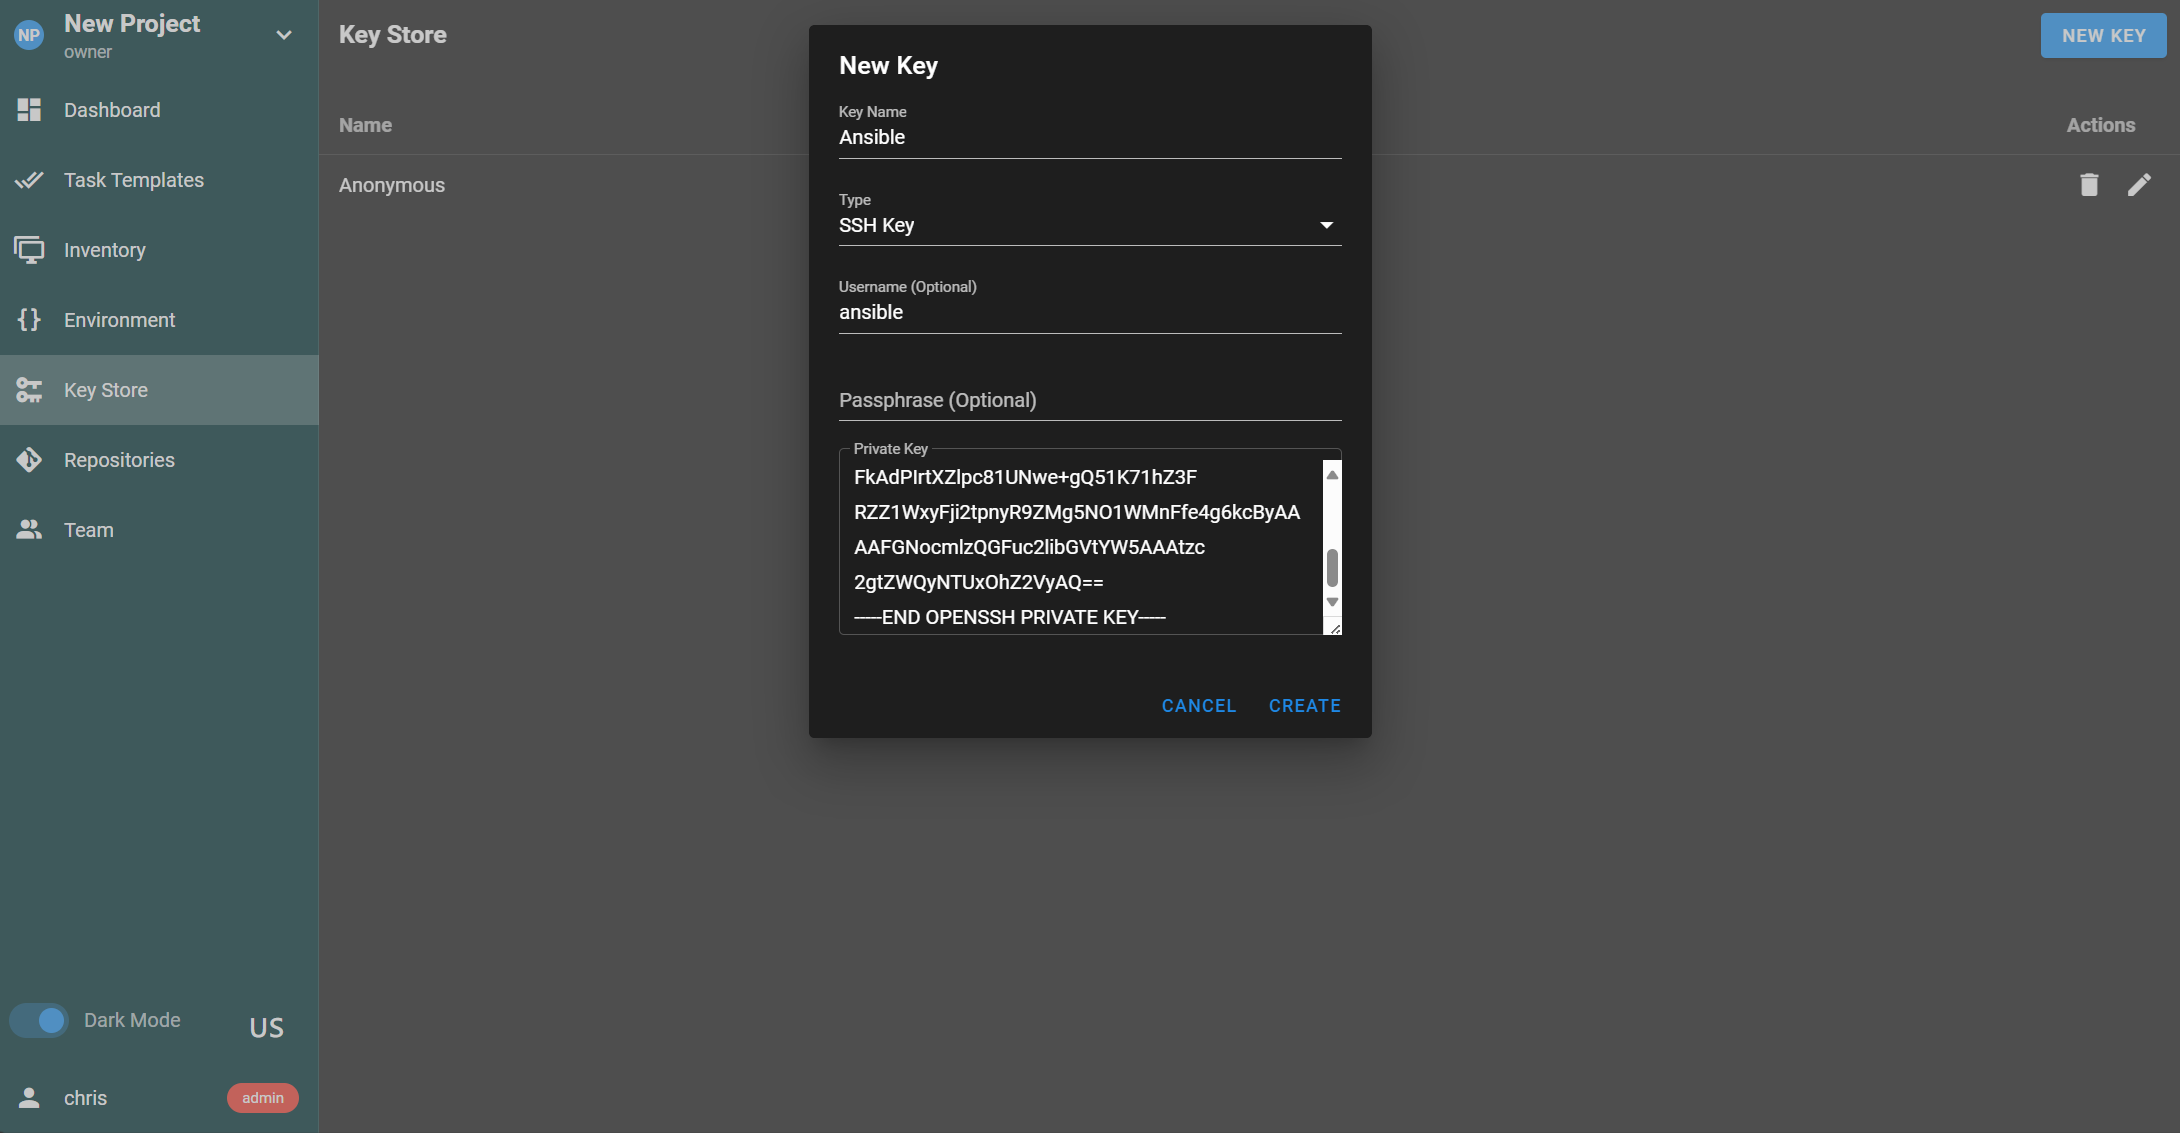
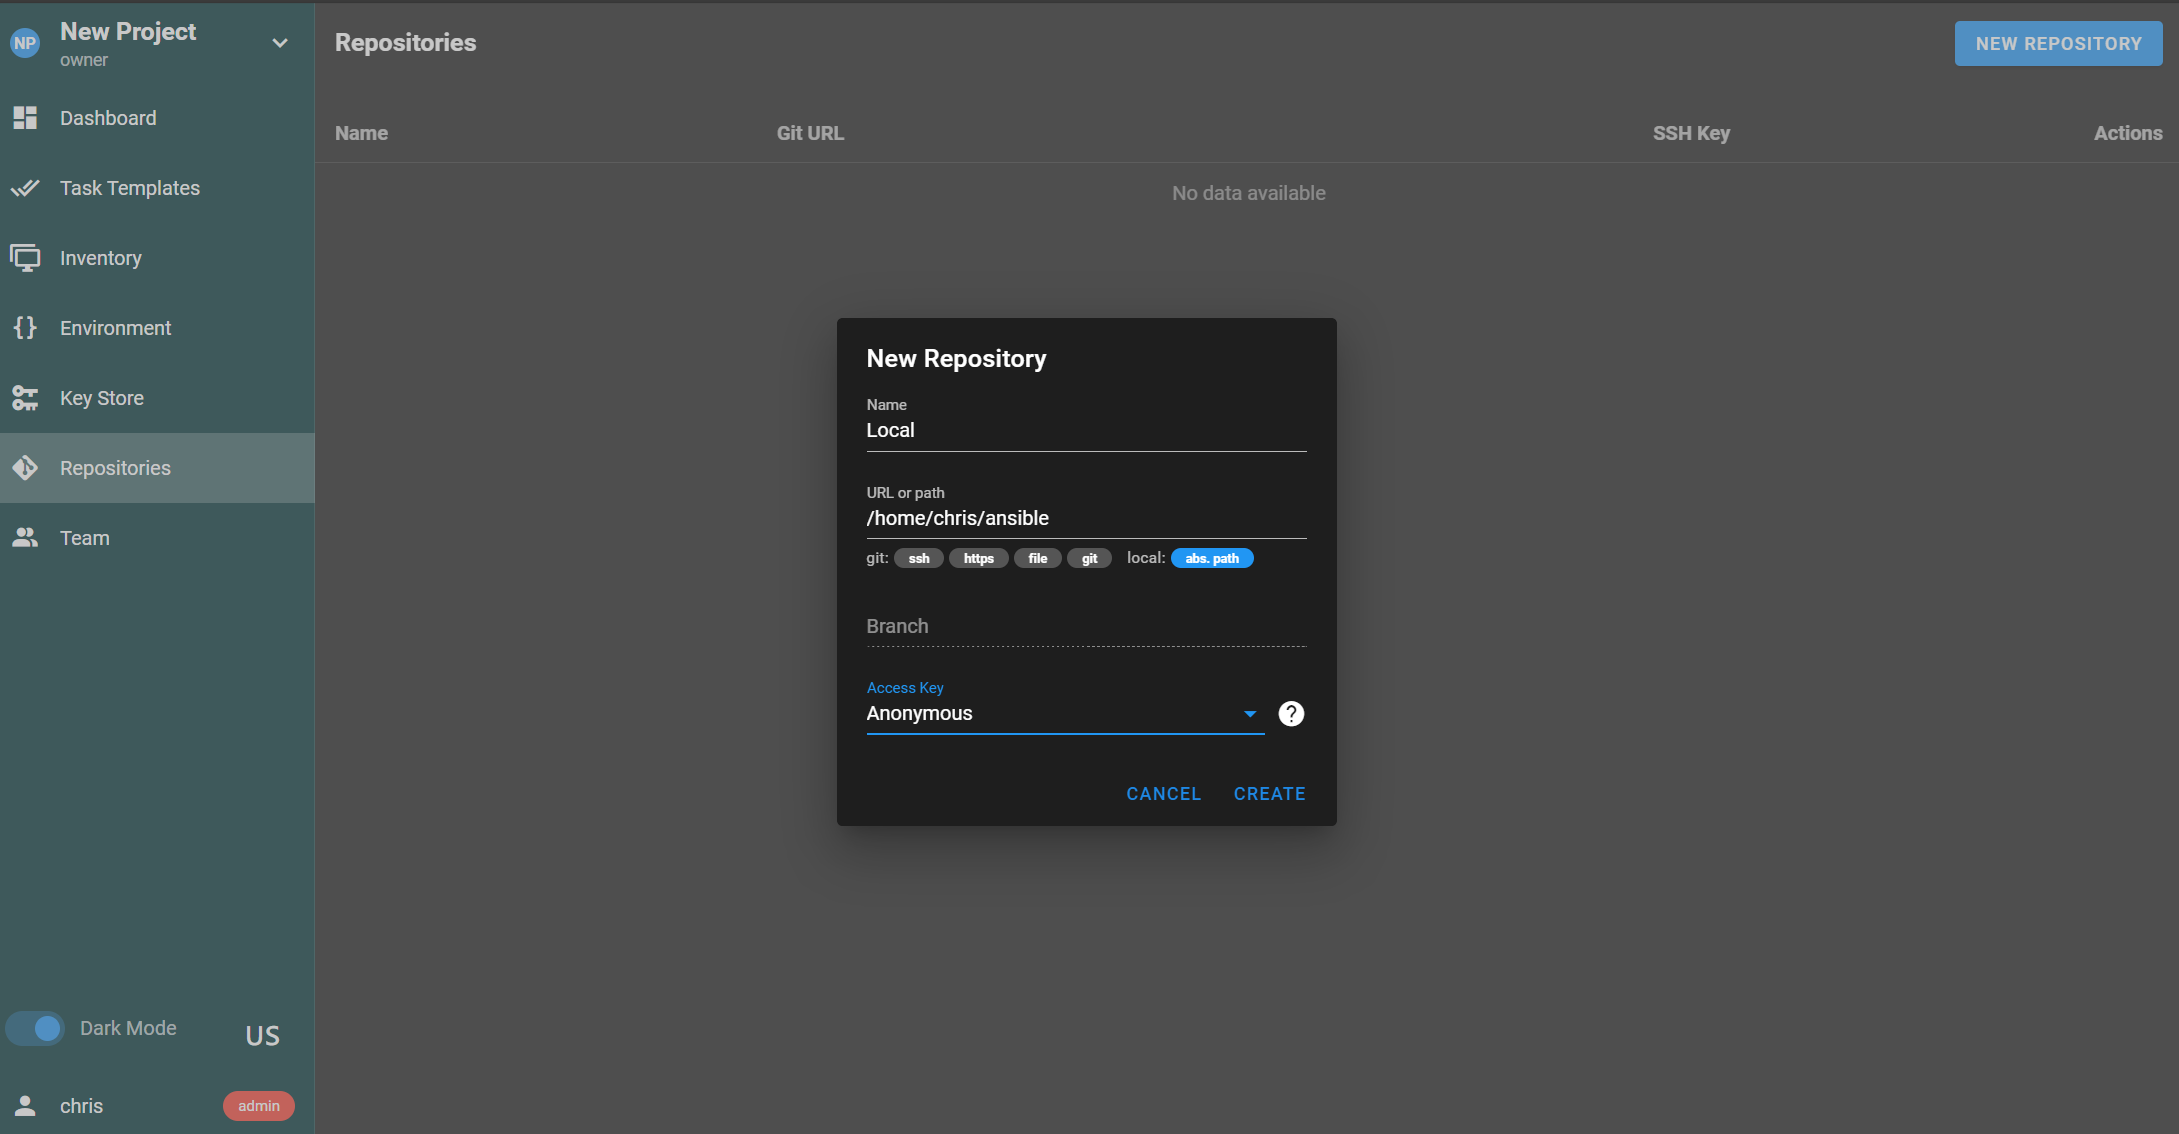
Now we can set up the repository. The repo can be a Git location, an SSH location, HTTPS, A File, Or a local folder.
In this case we are using a local folder. Our home path in the “Ansible” Folder /home/chris/ansible
Because this is a local path we can set the Access Key to the “Anonymous” key we set up previously.
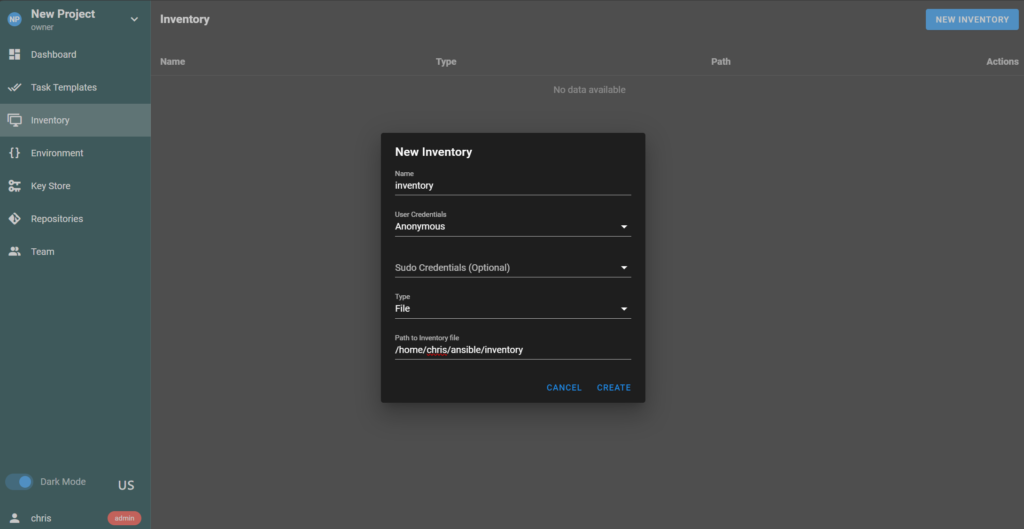
now we can set the Inventory. Here you have the option of Static, YAML, or File.
Static you can type out your inventory file like we did previously and save it here.
YAML you can enter a YAML formatted inventory file.
File you can set a local file that already has the inventory.
We are going to select “File” and point to the inventory file at /home/chris/ansible/inventory
Give the entry a name at the top.
select the SSH key in the User Credentials dropdown because this is a local file.
Click Create.
!!! DO NOT SELECT ANONYMOUS LIKE IN THE IMAGE !!!
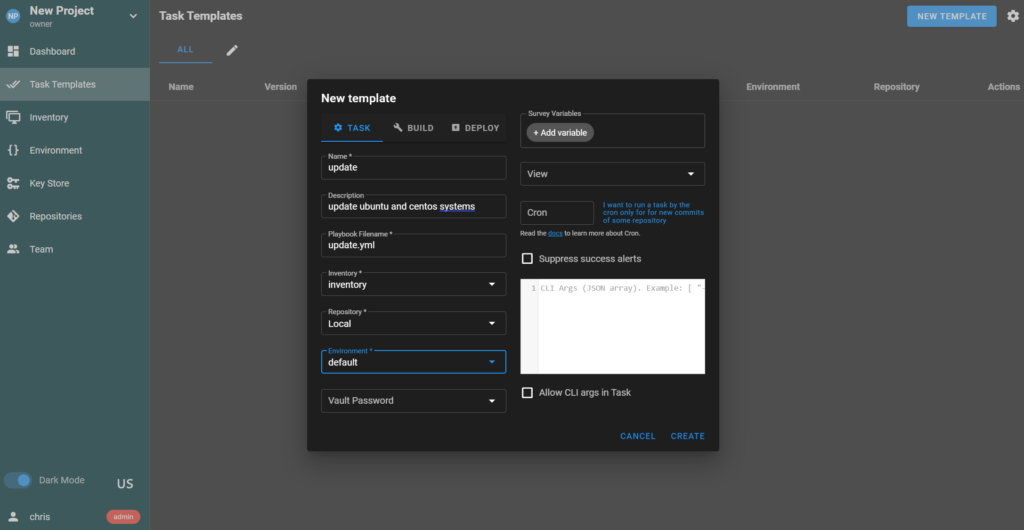
Now we can define a Task Template. The task template is what is going to actually run the Playbook.
We are going to use the update yml file created in the Ansible quick setup guide.
For Name enter “update”.
Give it a brief description in the Description field.
for Playbook Filename enter update.yml.
Select ‘inventory’ from the dropdown menu.
Select the local repository in the Repository dropdown menu.
Click “CREATE”
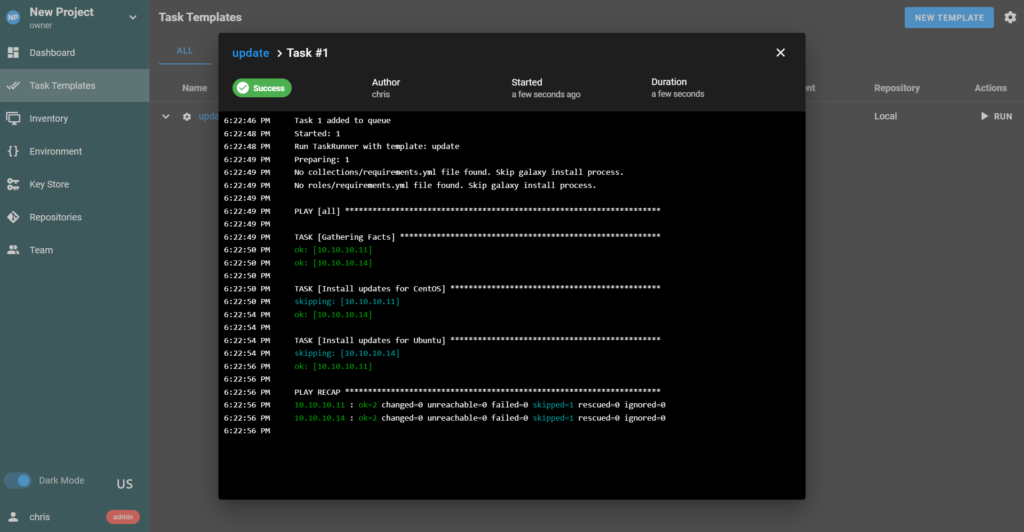
Now you should be able to run the task. Hit the play button on the right side and you should see it run.
If successful you are finished.
There are a ton of features and setup options that were not explored here. You can find more in the official documentation.
Thank you!